
Introduction
Welcome to our guide on how to customize the header in WordPress. The header is an essential element of your website as it showcases your site title, logo, navigation menu, and other important information. In this article, we will delve into the process of customizing your WordPress header using various methods and tools available. Whether you are using the site editor, customizer, or specific themes, we will cover it all. So, let’s get started and make your website’s header truly unique and visually appealing.
Understanding the WordPress Header
Before the customization process, let’s take a moment to understand what exactly the WordPress header is. The header typically appears at the top part of your website and consists of elements like the site title, logo, navigation menu, social media icons, and call-to-action buttons. It serves as the first impression for your visitors, so it’s crucial to make it visually appealing and functional.
Customizing the Header Using Full Site Editing in WordPress
With the introduction of full site editing, customizing the header in WordPress has become much easier. You no longer need to rely on custom code or plugins to make changes. Let’s explore how you can customize your WordPress header using the site editor.
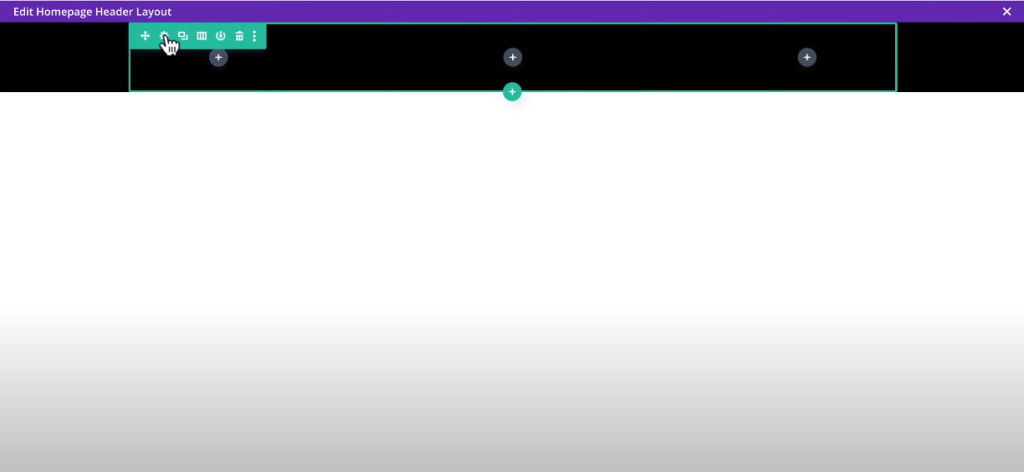
Accessing the WordPress Header in the Site Editor
To access the WordPress header in the site editor, navigate to your dashboard and select Appearance. From there, choose the Editor option. In the editor, you can easily make changes to your header by dragging and dropping elements, reordering them, and adding new blocks.
Styling the Header
Once you access the header in the site editor, you have the flexibility to style it according to your preferences. You can adjust the size of the logo, change the fonts, colors, and button styles. The site editor provides a user-friendly interface where you can see the changes in real-time as you make them.
Creating Multiple WordPress Header Template Areas
One of the advantages of full site editing is the ability to create multiple header template areas for different sections of your website. Let’s explore how you can add new headers to templates, use premade pattern headers, or create a new header from scratch.

Adding a New Header to a Template
If you want to add a new header to a specific template, you can easily do so in the site editor. Simply select the template where you want to add the header and choose the header template part. From there, you can customize the header according to your requirements.
Using a Premade Pattern Header
WordPress offers premade pattern headers that you can use to quickly change the look of your website’s header. These patterns provide various layouts and designs, making it easy to create a unique header without starting from scratch. Simply select the pattern you like, customize it further if needed, and apply it to your header.
Creating a New Header From Scratch
For those who prefer complete customization, you can create a new header from scratch in the site editor. This gives you full control over every element of your header, allowing you to design it exactly the way you envision. Add blocks, rearrange them, and style them to create a header that truly represents your brand.
Using Divi to Add and Customize WordPress Headers
Divi is a popular WordPress theme that offers extensive customization options, including the ability to add and customize headers. If you are using Divi, you can take advantage of its built-in header builder to create stunning headers. With Divi, you can easily add logos, menus, search bars, social icons, and more to your header. The intuitive drag-and-drop interface makes it easy to design and customize your header without any coding knowledge.
Follow These Steps
Login to your WordPress Dashboard: Open your web browser and navigate to your WordPress website. Add “/wp-admin” at the end of your website URL (e.g., http://yourwebsite.com/wp-admin) and log in with your credentials.
Navigate to the Divi Theme Options: Once logged in, go to the WordPress Dashboard.
In the left sidebar, find and click on “Divi.”
Access Theme Builder: In the Divi menu, you’ll see an option called “Theme Builder.” Click on it.
Edit Header: Inside the Theme Builder, locate and click on the header section. This will allow you to edit the header.
Edit Header Content: You will be taken to the header editing interface. Here, you can add or modify elements, such as the logo, navigation menu, and other header components.
Customize Design and Layout: Divi provides a visual builder that allows you to customize the design and layout of your header easily. You can click on elements to edit their content, change styling, and adjust their position.
Save Changes: After making the desired changes, make sure to save your work. Look for a “Save” or “Publish” button to apply the changes.
Preview Changes: It’s a good practice to preview your changes before making them live. You can use the preview option to see how your updated header will look.

Clear Cache (if applicable): If you have a caching plugin installed, clear the cache to ensure that your changes are reflected immediately.
Check on the Frontend: Visit your website’s frontend to verify that the changes you made to the header are displayed correctly.

FAQs
As you dive into customizing your WordPress header, you may have some questions. Let’s address some commonly asked questions to help you navigate the process smoothly.
Will Customizing One Header Affect All Headers Throughout My Site?
No, customizing one header will not affect all headers throughout your site. With full site editing, you have the flexibility to customize headers for specific templates or sections of your website. Each header can have its own unique design and layout.
How do Header Template Parts Work?
Header template parts allow you to create different headers for different templates. You can customize each template’s header independently, providing a tailored experience for your visitors. This flexibility ensures that your headers align with the content and purpose of each template.
What Kind of Blocks Can I Use in a WordPress Header?
You can use a wide range of blocks in your WordPress header to add various elements and functionalities. Some commonly used blocks include the site logo block, navigation block, search block, social icons block, and button block. These blocks can be customized to match your brand and enhance the usability of your header.
How do Global Site Styles Affect My Header Style?
Global site styles allow you to define consistent styles across your entire website, including your header. By setting global styles for fonts, colors, spacing, and other elements, you can ensure that your header aligns with the overall design of your site. This cohesive styling creates a visually pleasing and professional look.
Customizing Your Website’s Header Is Easier Than Ever
In conclusion, customizing the header in WordPress has become easier than ever with the introduction of full site editing and powerful themes like Divi. Whether you choose to use the site editor, the customizer, or specific themes, you have the tools and flexibility to create a unique and visually appealing header for your website. Remember to consider the overall design and usability of your header, and ensure that it accurately represents your brand. With these customization options at your fingertips, your website’s header will make a lasting impression on your visitors. So, go ahead and unleash your creativity to customize your WordPress header today!